
Email remains a dominant communication tool in today’s digital age, with billions of emails sent daily. By the end of 2022, 333.2 billion emails were sent and received each day, and this number is expected to reach 376.4 billion by 2025. With this volume, individuals and businesses need efficient ways to manage their communication, and one of the best tools for this is email templates in Outlook.
What are email templates and why should you use them in Outlook?
Email templates help save time and ensure consistency across messages. Whether you're handling customer queries or sending out routine updates, templates keep your communication professional and uniform.
Studies show that employees spend about 28% of their workweek managing emails, making templates a valuable tool for streamlining workflows.
This article will guide you through creating, saving, and using email templates in Outlook to boost productivity.
What is an email template?
An email template is a pre-designed message that you can reuse for sending similar emails. Instead of starting from scratch every time, a template provides a consistent structure for your emails. You simply add specific details, like names, dates, or personalized information, while the rest of the email remains the same.
This is especially useful for recurring messages such as meeting invites, follow-up emails, or customer service responses.
Why use email templates in Outlook?
Email templates are a powerful tool, particularly in business settings where time and consistency are crucial. Here are the key benefits of using email templates in Outlook:
- Saves time - one of the biggest advantages of using templates is the time-saving factor. If you frequently send similar types of emails, templates eliminate the need to draft each message from scratch. Simply load your template, make minor adjustments, and send it. This can significantly reduce the time spent managing emails.
- Ensures consistency - consistent communication is vital for maintaining professionalism and brand identity. With templates, you ensure that every message has a uniform format, tone, and style, regardless of who sends it. This is especially useful for teams, where multiple people may be sending similar messages.
- Allows customization without repetitive work - while templates provide a pre-set structure, they also allow flexibility. You can easily personalize each message with specific details, such as the recipient’s name, relevant dates, or personalized content, without altering the overall format of the email. This helps maintain a personal touch in your communication while benefiting from the efficiency of templates.
Common uses for email templates
Templates are versatile and can be applied in a wide range of contexts. Some common uses include:
- Customer service responses: Replying to frequent inquiries with standardized responses that still allow for customization.
- Meeting invitations: Sending formal invitations with consistent information while tailoring details like time and location.
- Marketing campaigns: Standardizing email campaigns while customizing for individual segments or clients.
Prerequisites before creating an email template in Outlook
Before diving into the process of creating an email template in Outlook, it’s important to ensure that you have the right tools and basic understanding in place. While Outlook makes it relatively easy to create and use templates, there are a few key steps to check off before getting started.
Ensure you have Outlook installed
To begin, you’ll need to have Microsoft Outlook installed on your device. Outlook is available as part of the Microsoft Office Suite, which can be accessed through a subscription to Microsoft 365. If you’re using a desktop version of Outlook, make sure it’s updated to the latest version to avoid any compatibility issues when creating or saving templates.
If you haven’t installed Outlook yet, you can download and install it by visiting the official Microsoft Office website. Follow the installation instructions to get it set up on your device. For those using Outlook on the web, templates are also supported, but some features may differ from the desktop version.
Familiarize yourself with Outlook’s basic features
Before you start creating templates, it's important to be comfortable with some of Outlook’s basic email features. You should know how to:
- Compose an email: Understand how to start a new message, use the subject line, and write an email body.
- Save drafts: Be familiar with saving drafts, as the template-saving process is similar.
- Use formatting tools: Knowing how to format text, insert links, or attach files will help you create polished email templates.
By understanding these basic elements, you’ll find it much easier to follow the steps for saving and managing your email templates.
Check for add-ins or integrations
While Outlook has its own built-in template-saving feature, some users might benefit from add-ins or integrations that enhance template management. For instance, third-party tools or plugins can automate the use of templates or offer more customization features, you can even use AI email assistants that are available as add-ins.
However, if you’re just starting, the default Outlook template functionality is more than sufficient. If you want to explore additional options later, you can visit the Microsoft AppSource or explore the Outlook add-ins section for tools that may improve your email workflow.
Once you’ve confirmed that you have Outlook installed, understand the basics of its email features, and checked for any potential add-ins, you’re ready to begin creating your email templates.
Step-by-step guide on how to create an email template in Outlook
Creating an email template in Outlook can greatly improve your productivity by allowing you to quickly send pre-written emails for repetitive tasks. Below is a detailed step-by-step guide to creating and using email templates in Outlook, based on the latest processes.
Creating an email template in Outlook (Desktop app)
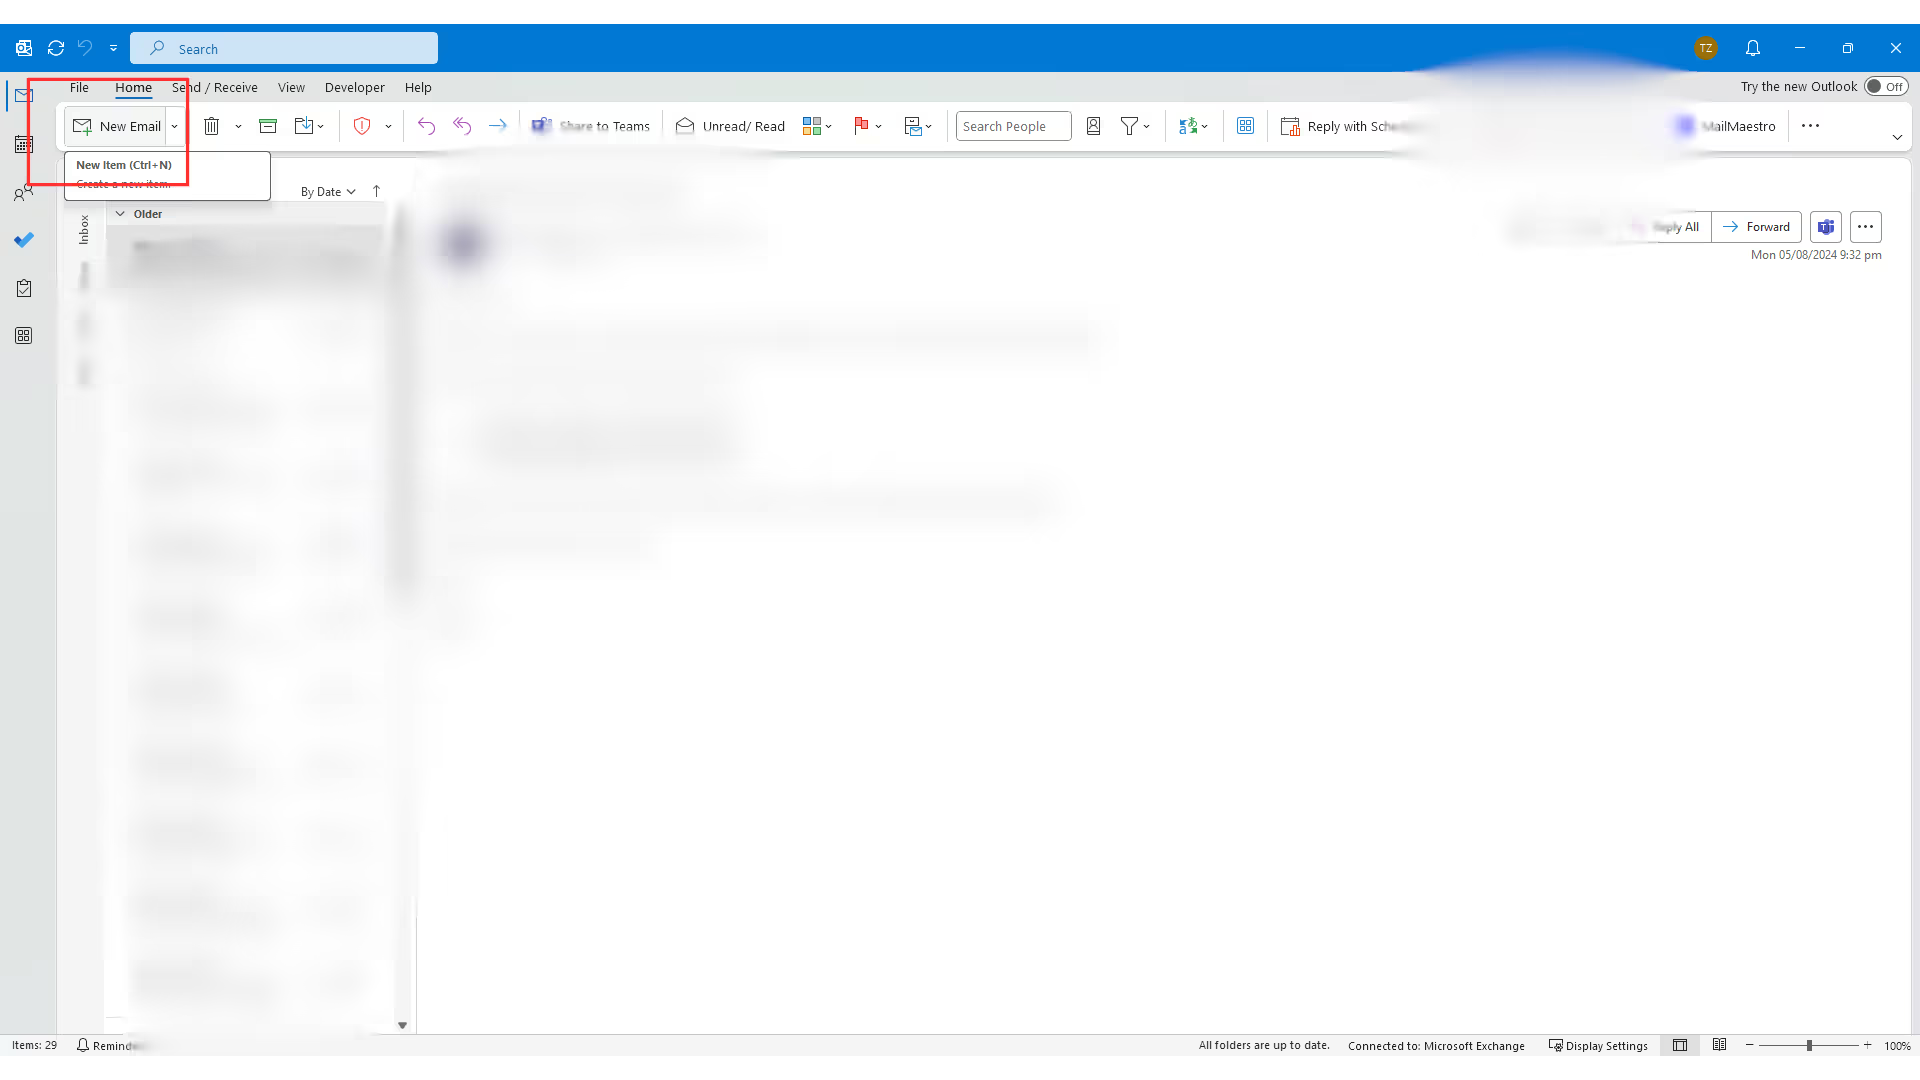
Step 1: Open a new email in Outlook
Start by launching Outlook on your desktop. From the Home tab, click New Email to open a blank message window.
Step 2: Compose your template email
Write the body of your email, including any text, formatting, or placeholders where you will insert custom information later. For example, you can write a customer follow-up email template like this:
- Subject: Follow-up on Your Inquiry
- Body:
"Hi [Customer Name],
Thank you for reaching out to us on [Inquiry Date]. We’ll get back to you shortly. If you have any further questions, feel free to reply to this message."
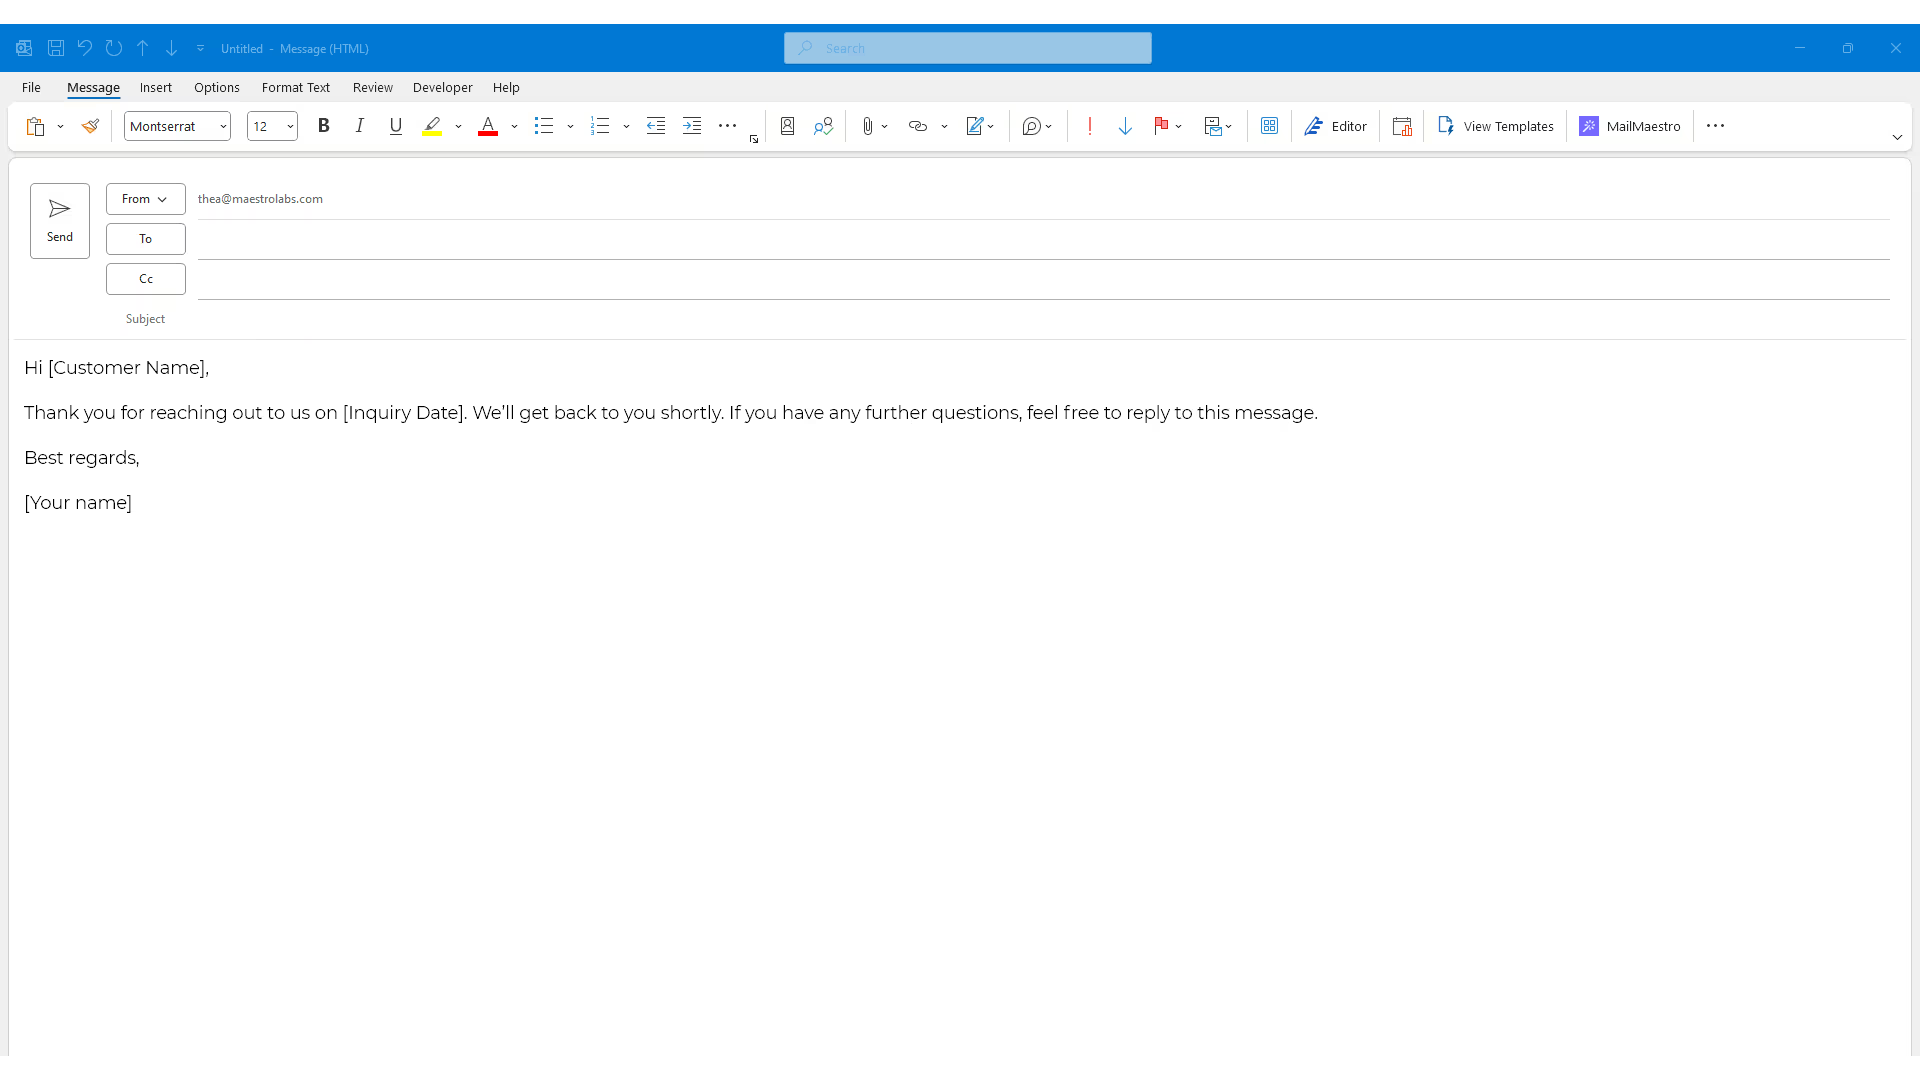
Use text formatting tools to customize the appearance (e.g., bold or italic text, bullet points), and insert images or links as needed. Note that attachments won’t be saved with the template, so you’ll need to manually add them each time.
Step 3: Save the email as a template
Once your email draft is complete, go to the File menu in the top-left corner of the email window. From there, select Save As. In the Save As dialog box:
- Choose Outlook Template (*.oft) from the dropdown menu.
- Give the template a clear and descriptive name (e.g., “Customer Follow-Up Template”).
- Click Save.
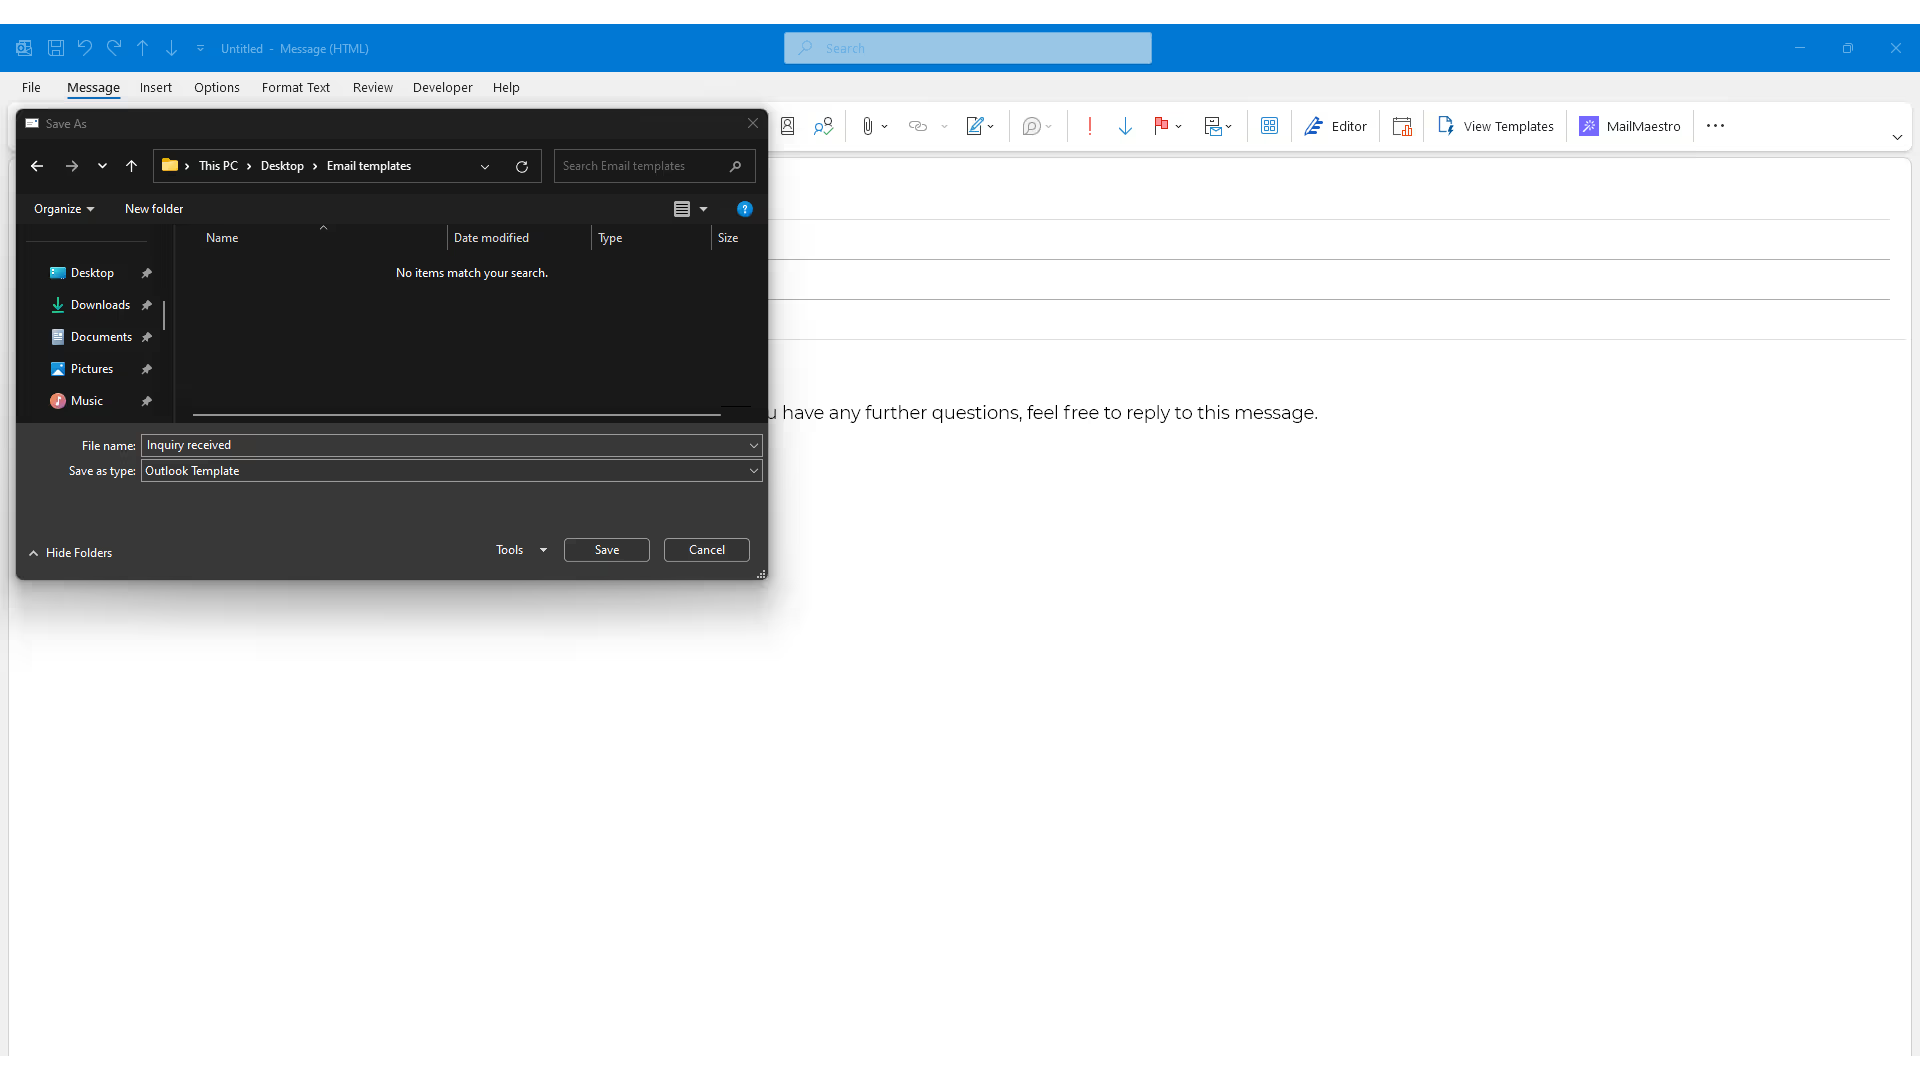
Your email template is now saved and ready to use.
Not sure how to write professional emails for your templates? Try MailMaestro to draft your personalized emails.
Using an email template in Outlook
Step 1: Open the template
To use a saved template, go to the Home tab and click on New Items > More Items > Choose Form. In the Choose Form dialog box, select User Templates in File System from the dropdown list. This will bring up your saved templates.
Find the template you want to use, select it, and click Open.
Step 2: Customize and send the email
Once the template loads, you can customize the placeholders, such as adding the recipient's name or adjusting specific details like dates. You can also add attachments as necessary.
After customizing, hit Send to deliver your message. This method ensures that your email is consistent and formatted every time, without the need to recreate the message from scratch.
Creating templates in Outlook (Web Version and New Version)
For users who prefer Outlook’s web version or Outlook New version, follow these steps to create and use templates:
Step 1: Sign in to Outlook Web / Launch Outlook New
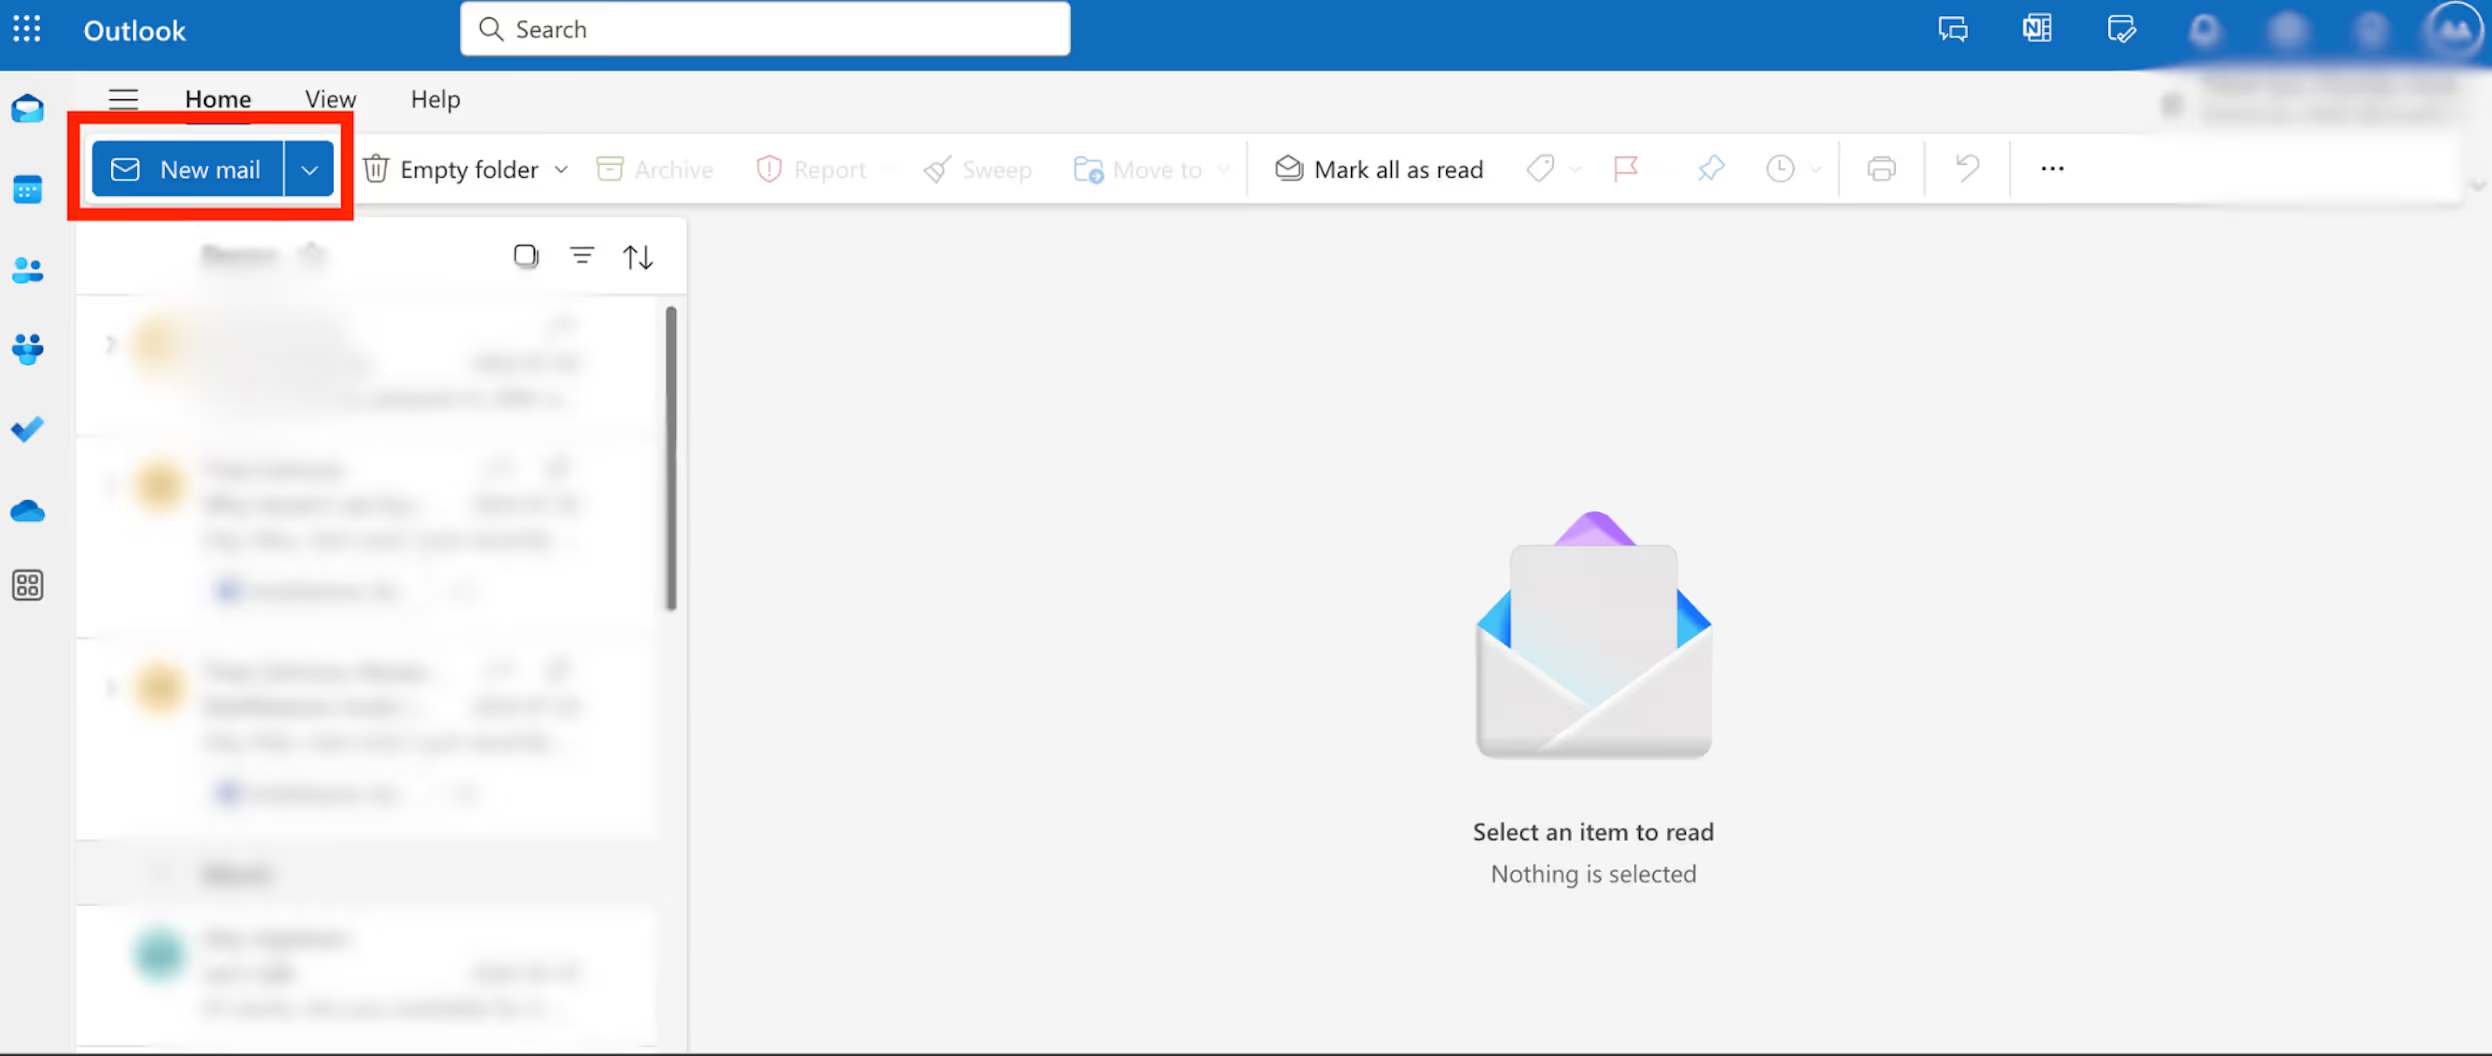
Visit Outlook.com and sign in with your account. For those who are on Outlook New, simply launch the application.
Next, click on New Mail to start composing a new message.
Step 2: Access "My Templates"
In the new email window, click the Add-ins button in the ribbon. Look for to My Templates.
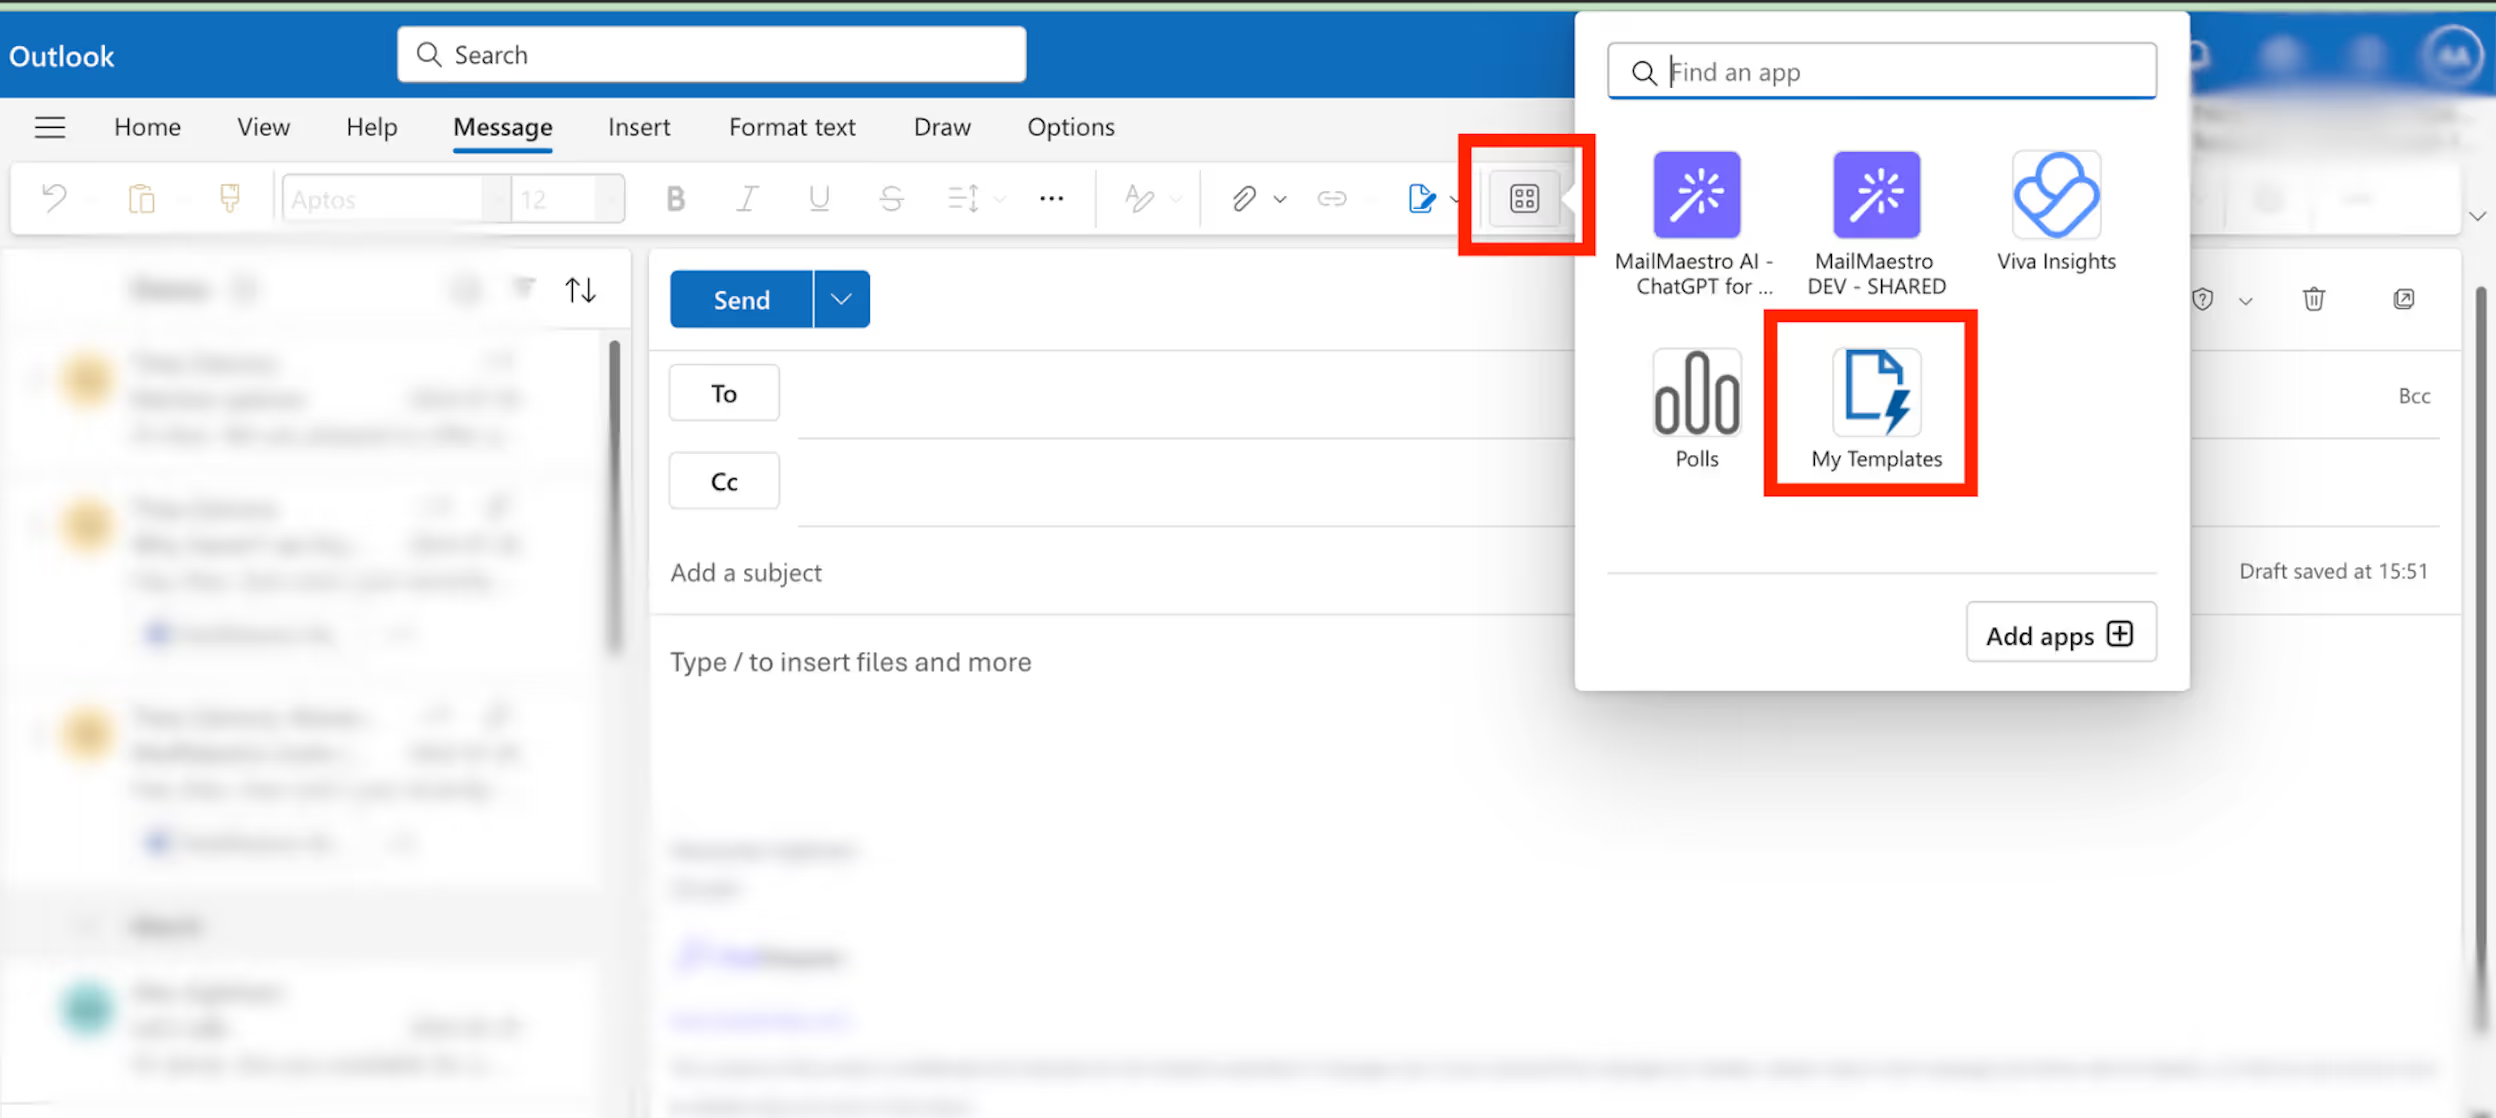
And if it’s already enabled, click +Template to create a new one.
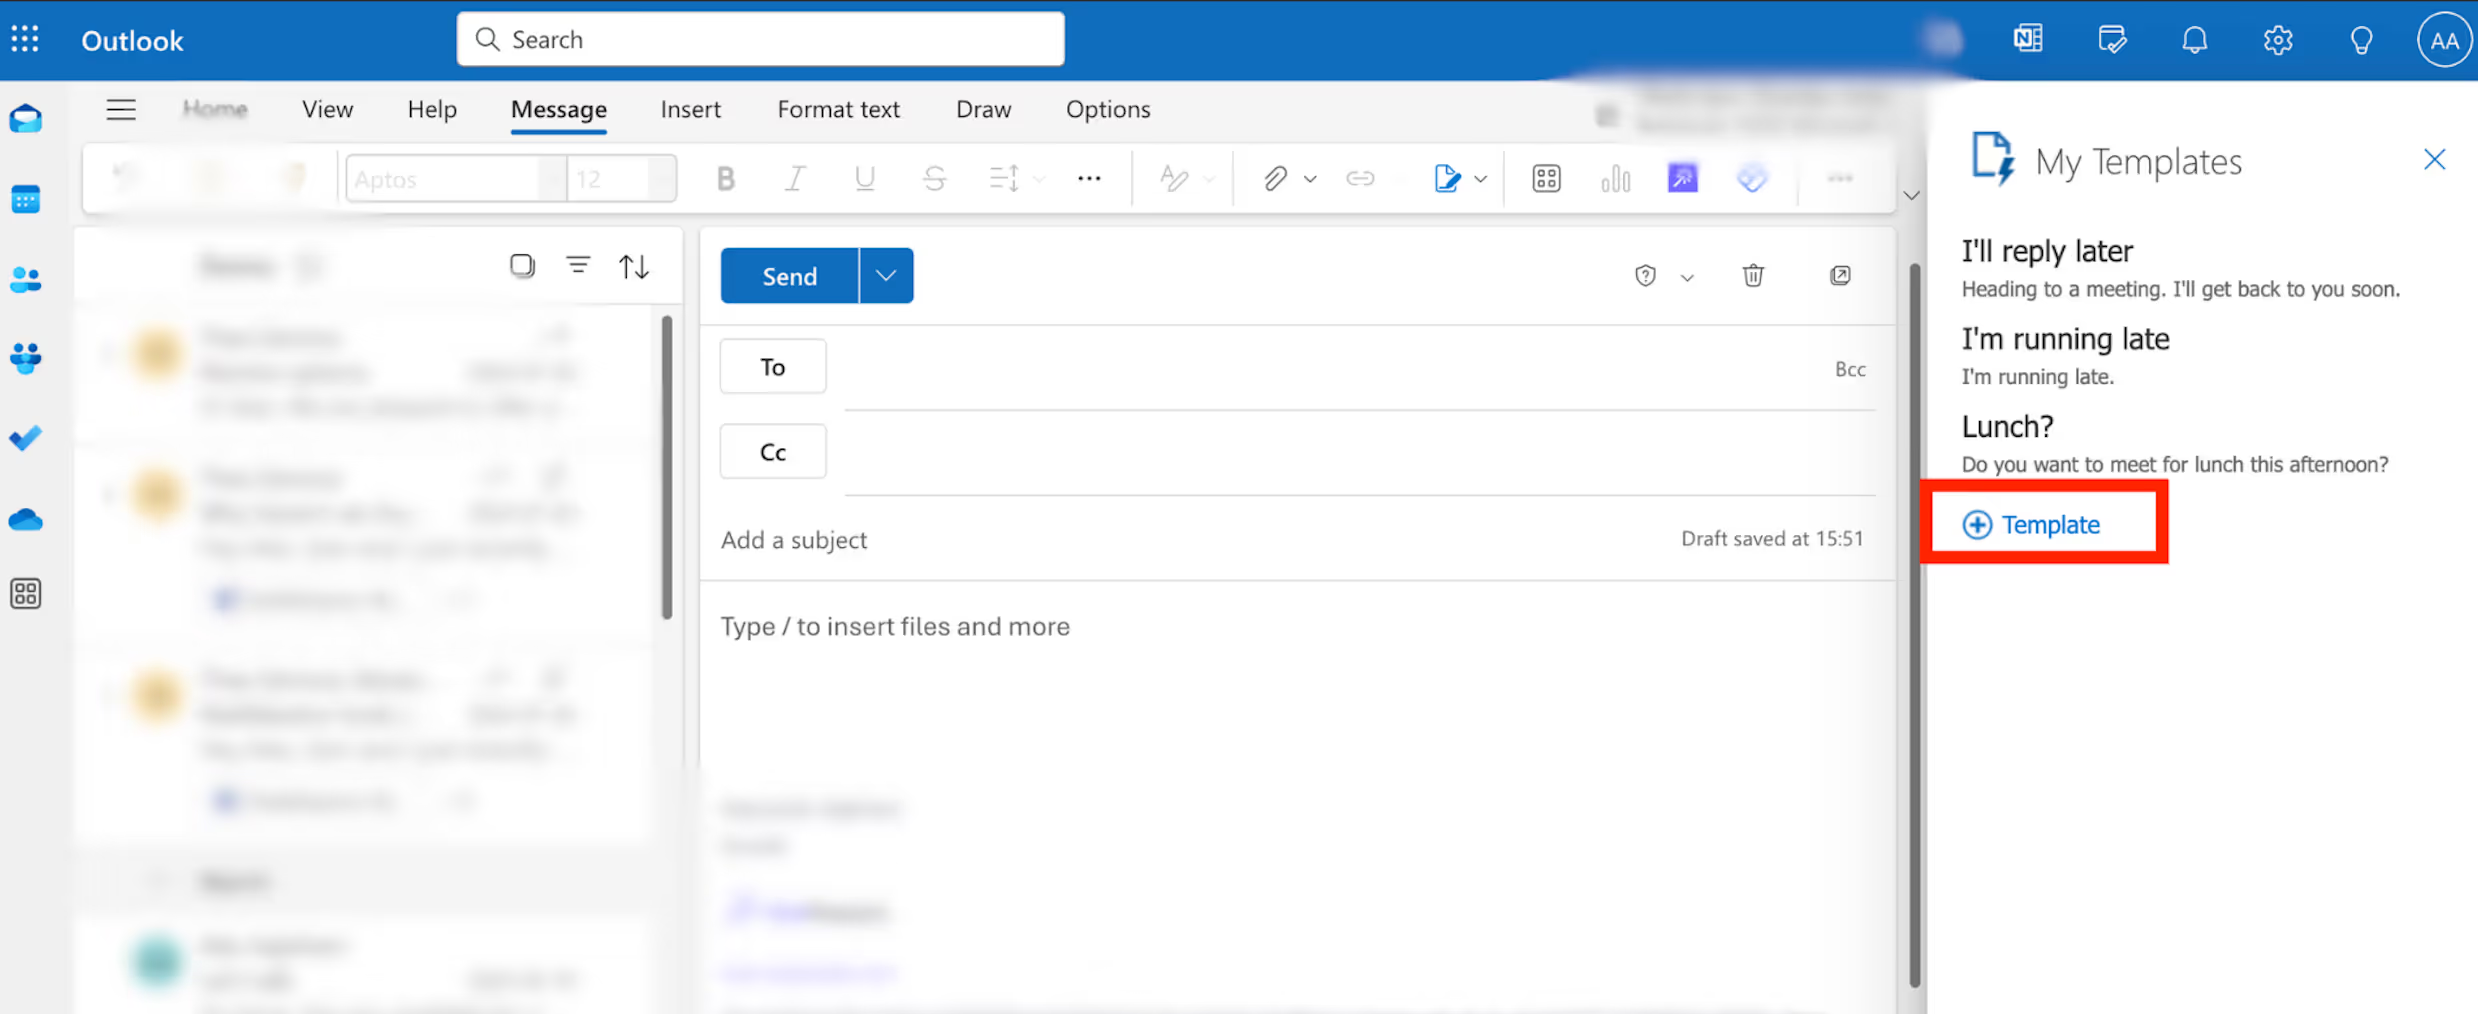
Step 3: Name and save your template
In the dialog box that appears, enter a name for your template, write the body text, and click Save. Your template will now be saved in the My Templates section and can be used in future emails.

Creating an email template using MailMaestro
To get started, make sure you've already downloaded MailMaestro from Microsoft Appsource!
Step 1: Start a new draft
Start by opening MailMaestro from your Outlook. From the Home tab, the easiest way is to click on New Mail.
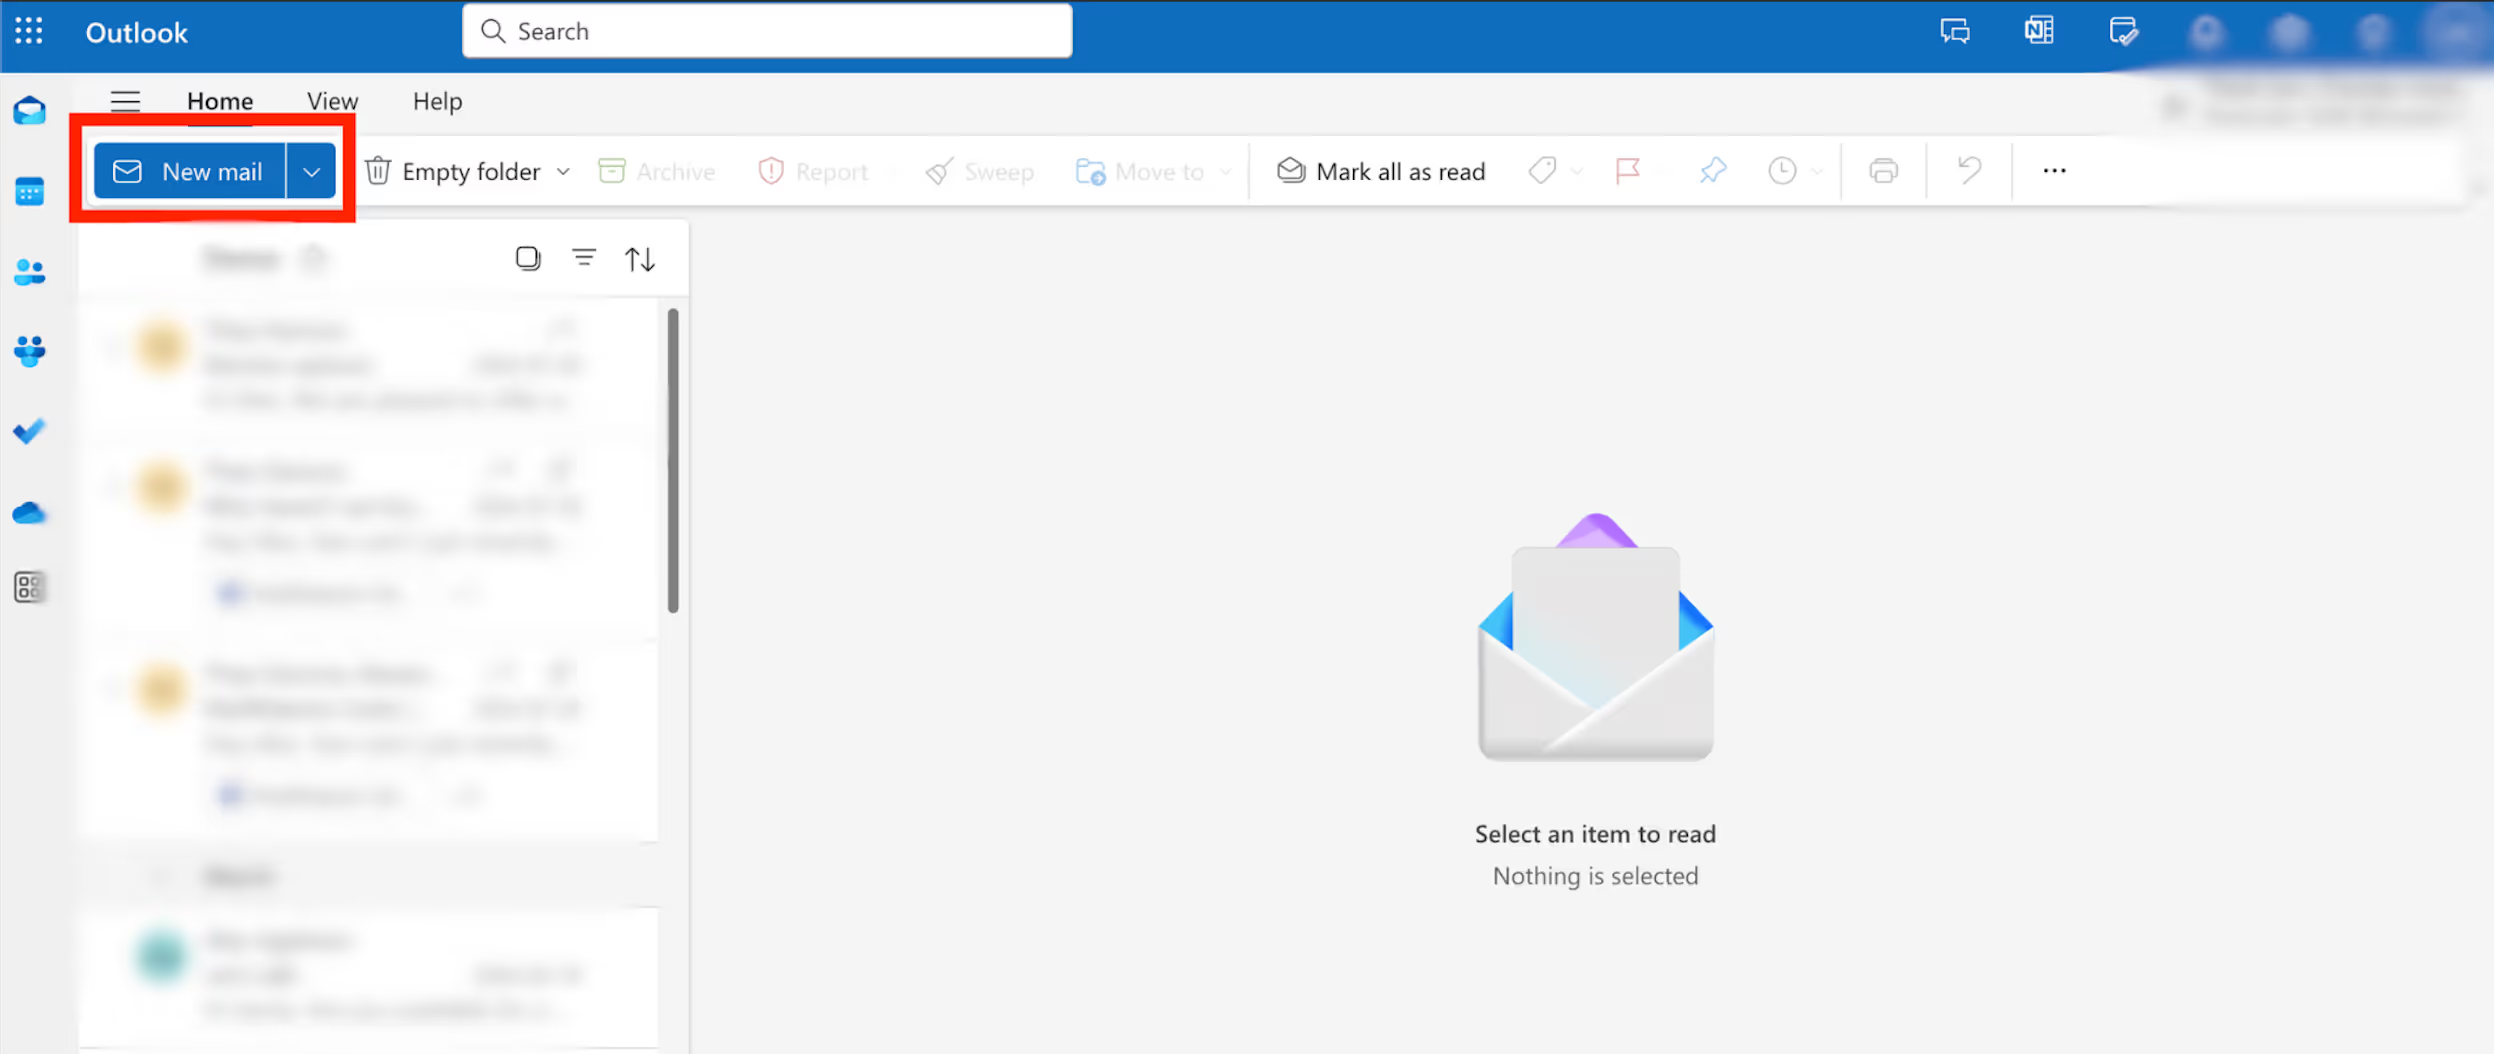
Step 2: Launch MailMaestro from your Outlook
In the new email window, click the Add-ins button in the ribbon. Look for to MailMaestro.
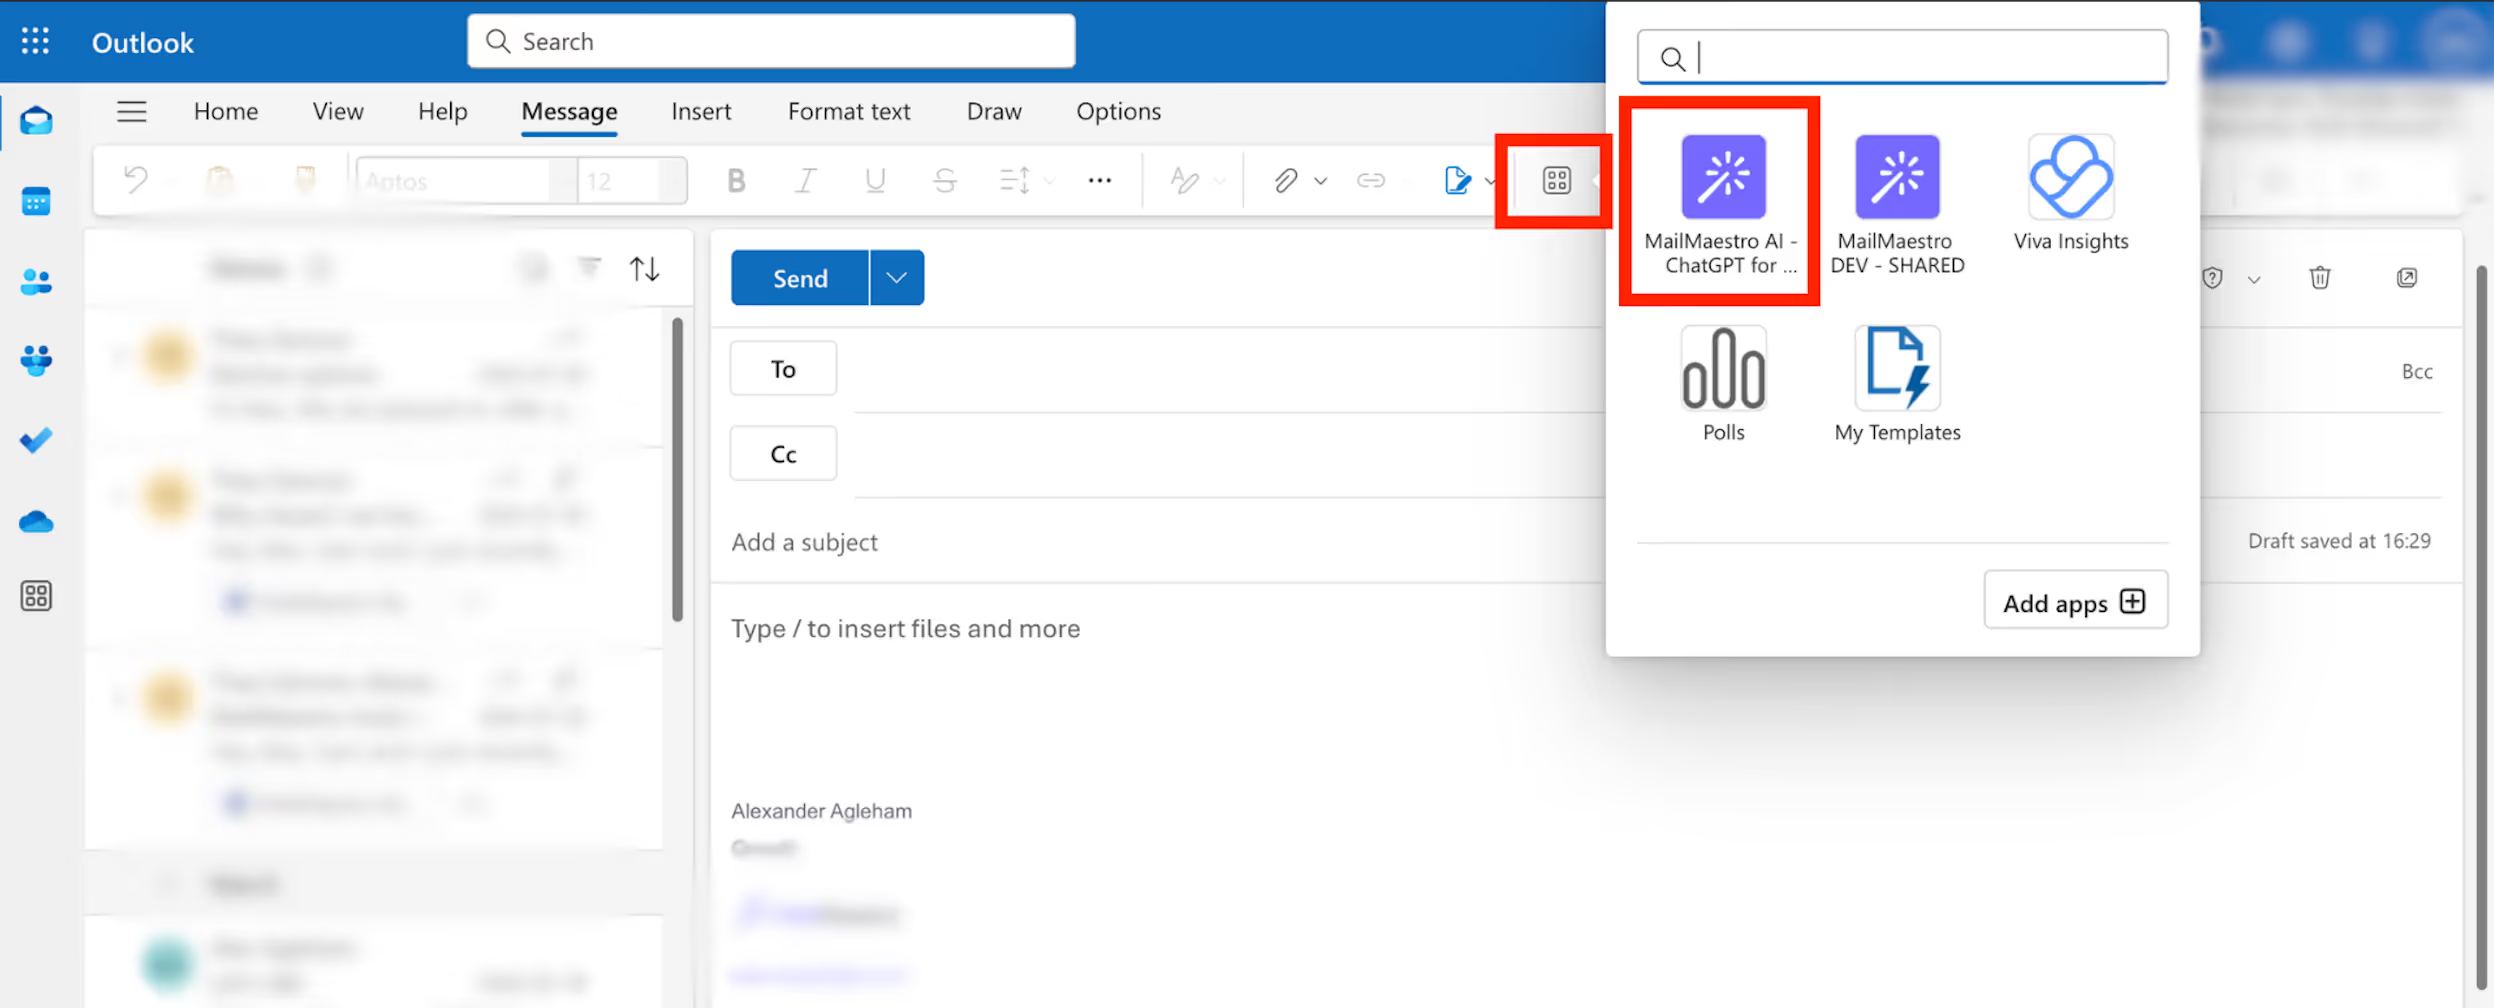
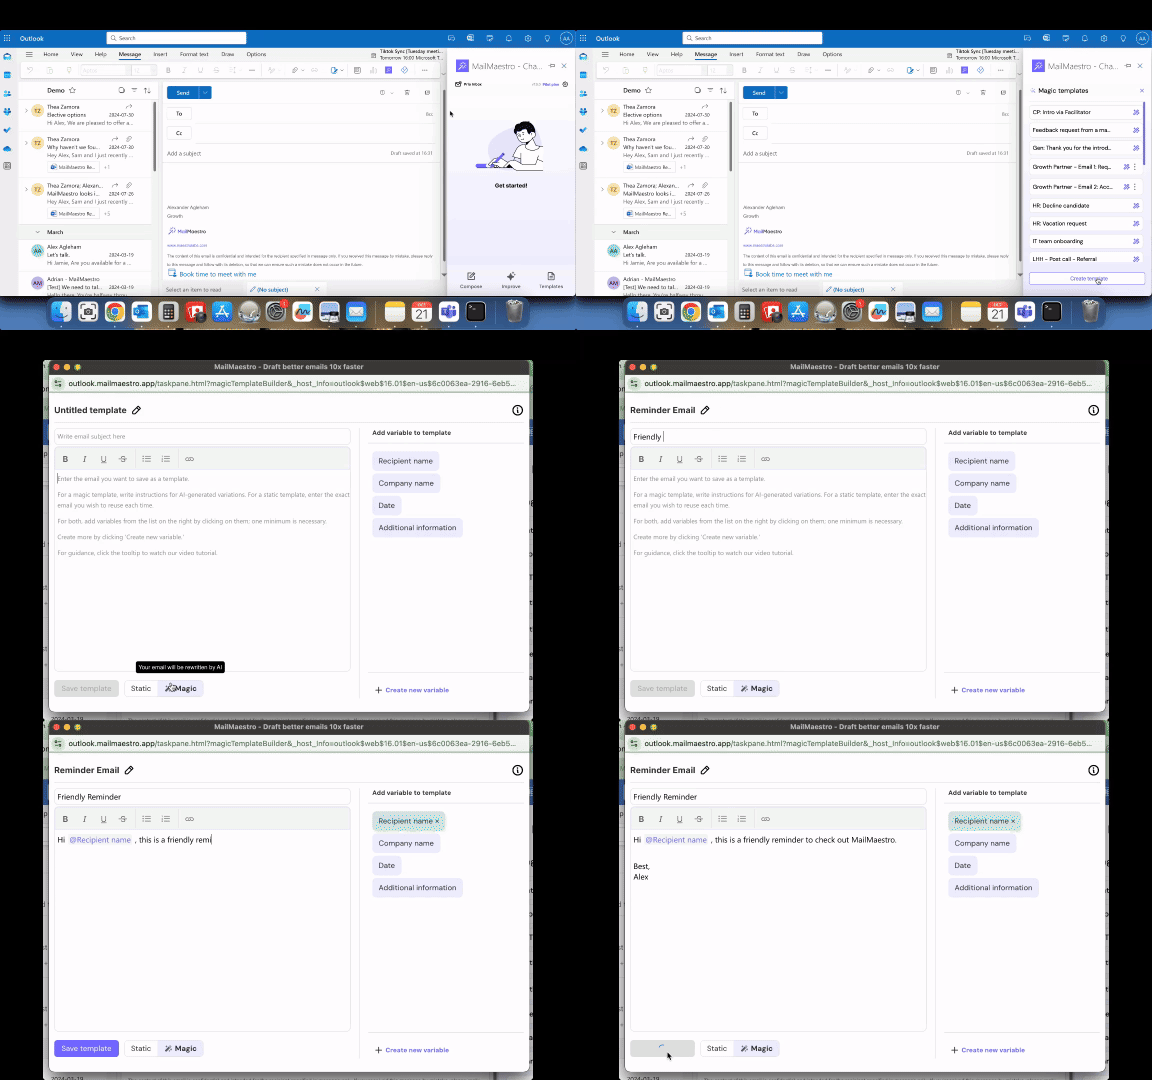
Step 3: Create your new Outlook email template
From the homescreen, click on Templates on the lower-right corner. Click on "Allow" from the prompt.
Then on the new window, start by filling in the name of the template so it's easier for you to remember, then start writing the subject line and body of your new email template for Outlook. Hit save when you're done.
Best Practices for Template Management
- Organize your templates: As you create more templates, it’s a good idea to maintain a clear naming convention so you can quickly find what you need (e.g., “Client Follow-Up,” “Weekly Report Reminder”).
- Keep templates simple: Avoid overcomplicating the design or structure of your templates. Simple, clean formats with clear placeholders work best and are easier to manage.
- Test before using: Always test your templates by sending them to yourself first. This allows you to check for formatting issues and ensure that placeholders can be easily filled in.
By following these steps, you’ll be able to efficiently create, save, and use email templates in both the desktop and web versions of Outlook. These templates will streamline your communication process, saving you valuable time while maintaining consistency and professionalism.
Customizing and automating email templates in Outlook
Once you’ve mastered the basics of creating and using email templates, you can start exploring advanced features in Outlook. These features allow you to further customize your templates and automate repetitive tasks, making your email workflow even more efficient.
Adding attachments to templates
Outlook doesn’t save attachments within the template itself, but you can easily add them manually. Here’s how:
- Open the template: When loading a template, as outlined in the previous chapter, customize your placeholders first.
- Manually attach files: Click the Attach File button from the toolbar, locate your document, and attach it to the email. Ensure the file size is within standard email limits to prevent delivery issues.
Since attachments can’t be stored with the email template, it’s important to include a reminder for yourself within the body of the template to attach any relevant files.
Setting up automated responses using email templates
Outlook’s Rules feature allows you to automate sending specific templates based on predefined conditions. For example, you can set up an automated out-of-office response or trigger specific emails when you receive messages with certain keywords.
Here’s how to automate your responses using templates:
- Go to File > Manage Rules & Alerts.
- Create a New Rule: Choose Apply rule on messages I receive and specify the condition (e.g., certain words in the subject or body).
- Set Action: Under the action options, select Reply using a specific template and choose the template you previously saved.
- Finish the Rule: Name the rule and finalize it. Outlook will now send the chosen template automatically when conditions are met.
This is especially useful for repetitive tasks like acknowledging receipt of an email, sending follow-up reminders, or auto-responding to inquiries.
Additional automation tips
- Create a template for recurring meetings: Set up templates to send reminders or details about recurring meetings. You can automate sending these emails using rules or schedule them manually using Delays or Recurring Events.
- Use Quick Steps: Outlook’s Quick Steps feature allows you to automate multi-step tasks, including sending emails based on templates. To create one:
- Go to Home > Quick Steps and select New Quick Step > Custom.
- Select New Email and choose the template you want to use. Name your Quick Step for easy access.
- Now, you can quickly send out pre-written emails with just one click.
Tips and best practices for creating effective email templates in Outlook
Creating email templates is not just about saving time; it's also about ensuring that your communication is clear, consistent, and effective. Here are some tips and best practices to help you make the most out of your Outlook email templates.
Keep it simple and scannable
When creating a template, aim for clarity and simplicity. Avoid overloading your email with long paragraphs or excessive information. Use bullet points, short paragraphs, and headers to break up the content, making it easy for the reader to scan and understand the main points quickly.
- Use clear formatting: Apply formatting tools like bold, italic, and bullet points to make your content more readable. Make sure important information stands out without overwhelming the reader.
- Avoid large blocks of text: Recipients often skim emails, so structure your message to be quickly understood at a glance. Stick to short paragraphs (2-3 sentences) and space them out for readability.
Design and formatting considerations
A well-designed template can make a huge difference in how professional and engaging your emails appear. Here are some key design and formatting tips:
- Use consistent fonts and colors: Stick to a consistent font style and size throughout the email. If you are using your company's branding, incorporate the company’s colors into the email design (while ensuring that text remains legible).
- Add a professional signature: Include your professional signature at the bottom of each template. This can be automated in Outlook under File > Options > Mail > Signatures to ensure it's included in every message.
- Optimize for mobile: Many recipients will open emails on mobile devices, so ensure your template is mobile-friendly. Stick to simple layouts, large fonts, and concise messaging that looks good on smaller screens.
Test your template before regular use
Before using a template in live communications, it’s a good idea to test it first. Send the template to yourself or a colleague to see how it displays across different devices and email clients.
- Check for formatting issues: Make sure the template’s formatting stays consistent across various email platforms (e.g., Gmail, Yahoo, or mobile clients).
- Ensure personalization fields are functional: If you are using placeholders, ensure they are properly filled with the correct information when sending a test email.
Personalize without over-automating
While templates save time, make sure to add personal touches before sending. Avoid sending emails that feel robotic or too generic, especially when communicating with clients or customers. Small personalization, such as addressing recipients by their name or referencing specific details from past conversations, can go a long way in creating a positive impression.
- Customizable placeholders: Use placeholders in the template for personalized fields such as [Recipient Name], [Company Name], or [Inquiry Date]. Make sure to update these fields before sending to avoid sending a generic or incorrect message.
Common mistakes to avoid when creating email templates in Outlook
While creating templates can boost productivity, there are a few common pitfalls that can reduce their effectiveness. Here are some mistakes to avoid:
Avoid overcomplicating templates
It's easy to get carried away by adding too much information or unnecessary features. Overly complex templates can confuse the reader and become harder to update or use efficiently.
- Keep it focused: Stick to the essentials. Each template should serve a specific purpose without overwhelming the recipient with unnecessary details.
- Limi formatting: Using excessive formatting (colors, fonts, tables) may lead to rendering issues in different email clients.
Forgetting to optimize for mobile devices
More than half of emails are opened on mobile devices, so it's critical that your templates are mobile-optimized. If your template is too wide, has small fonts, or complex tables, it may not display properly on mobile screens.
- Use responsive design: Ensure that your email scales appropriately for smaller devices. Keep fonts readable, and avoid wide tables that might require horizontal scrolling.
Failing to personalize before sending
Sending a template without personalizing key details like the recipient’s name, date, or specific context can lead to a poor user experience. It gives the impression of generic, impersonal communication.
- Double-check placeholders: Always check placeholders like [Name] or [Company] and ensure they are replaced with the correct information before sending.
Ignoring regular updates
If you're using templates over a long period, it's easy to forget to update them. Outdated content, links, or information can affect your credibility and the effectiveness of your communication.
- Review regularly: Periodically review and update your templates to ensure they remain relevant and accurate, especially for dynamic content such as pricing or event information.
Troubleshooting email template issues in Outlook
Even though email templates in Outlook are efficient, users may encounter occasional problems. Here’s how to troubleshoot common issues:
Template not showing in folder
If you can’t find your saved template, it’s likely due to Outlook’s default file location settings.
- Solution: Go to New Items > More Items > Choose Form and check the User Templates in File System option. Ensure your template is saved in the correct location. If you moved the template manually, you may need to navigate to that folder.
Formatting issues in templates
Sometimes, email templates can look different when they reach recipients due to compatibility issues between email clients. This could result in inconsistent fonts, spacing, or images.
- Solution: Test your template by sending it to multiple email clients (e.g., Gmail, Yahoo, mobile) to see how it displays. If you notice any issues, simplify the formatting or ensure that all design elements are supported across various platforms.
Attachments not saving with the template
Outlook doesn’t save attachments with templates, which can be frustrating if you need to send the same attachments repeatedly.
- Solution: Include a reminder in the body of the template to attach the required files before sending. Attach the file manually when sending the email based on the template.
Personalization Fields Not Working
When using placeholders for personalization (e.g., [Name], [Date]), users sometimes forget to replace them with the correct information before sending.
- Solution: Double-check all placeholders before sending the email to ensure they’ve been replaced with accurate information. For better automation, consider using Outlook’s Mail Merge feature for bulk personalization.
FAQs about email templates in Outlook
Can I use the same template on multiple devices?
Yes, you can use your saved email templates across different devices as long as you have access to the same Outlook account. Templates saved on Outlook’s web or desktop version can be synced, but for local templates, you may need to manually transfer the .oft file between devices.
Can I share my email templates with others?
Yes, you can share templates by sending the .oft file to colleagues. Simply locate the saved template file, share it via email or other file-sharing services, and your colleague can import it into their Outlook.
How do I update an existing template?
To update an existing template, open it using the Choose Form option, make the necessary changes, and then re-save it using File > Save As. Overwrite the existing template or save it under a new name to keep both versions.


follow-up on our previous call, ask if he’s ready to start cooperation let him know that our discount ends tomorrow ask him if he had time to calculate roi


